We were lucky to have Tom Allen teach us all these years about car wash operations. Here is a repost of one of his more popular teachings.

Most car washes today use a simple 2 stack rotary switch. The front row or “stack” (the one closest to the knob) is a non-shorting stack. The back row or “stack” is a shorting stack, which is used for your motor starter on high pressure functions.

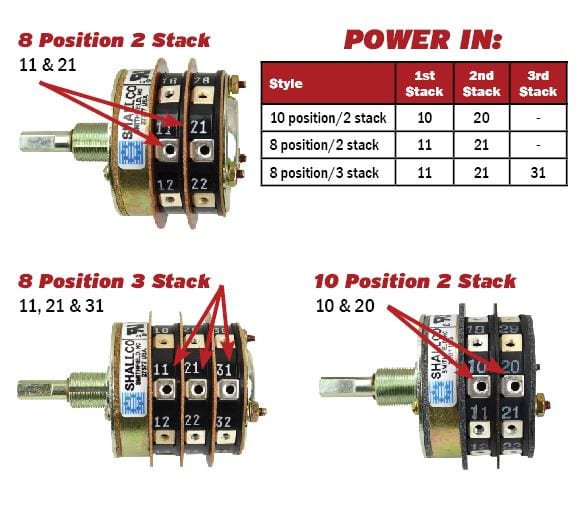
The first thing you want to be aware of is where your power is coming in at. On a standard 10 position switch, your power will come in on the #10 slot on the first stack and the #20 slot on your second stack.
For an 8 position, 2 stack Switch: #11/1st stack #21/2nd stack
For an 8 position, 3 stack switch: #11/1st stack #21/2nd stack & #31/3rd stack
3 Stacks (shown above) are only needed on systems that need to run 2 functions simultaneously. Such as a solenoid and a motor starter on high pressure functions. But for the most part, a 2 stack is most commonly used.
Finding the OFF / STOP Position
The second most important thing to remember is where your “stop” or “off” position is on your rotary switch. On the stem that the dial knob attaches to, you will find a groove or slot at the base of the stem. Depending on the brand of your rotary switch, the “stop” position may be at a different angle. Locating your stop position is key to wiring your switch.

When wiring your rotary switch, be sure to position the “stop” groove to match up with your faceplate decal, if your decal has “stop” at 11 o’clock, be sure to mount the rotary switch with stop at 11 o’clock. Then wire your other functions clockwise around the switch in accordance with your faceplate decal.


