With fears of Covid-19 ramping up again in the fall of 2020, Kleen-Rite decided to cancel our biennial expo that was to be held on November 18, 2020. Instead, we held an online Master Class. The goal of these classes is to provide our customers with valuable information from industry experts helping them run their car wash businesses more effectively. As a bonus to attendees, we offered them a free shipping deal and a chance to win prizes through a raffle. There were many classes held throughout the day all catering towards different aspects of running a car wash. Let’s take a deep dive into the Master Class about drop-shelf vending machine maintenance and upgrades held by Chip Kent from Laurel Metal Products.
Brief History of Laurel Metal Products
Laurel Metal Products was founded in 1959 by Rich Kent. The need existed for a reliable drop-shelf system in the car wash industry with a low production cost and fast assembly time. A coin mechanism was also needed with the same qualities. Since then Laurel has been adapting their vending machines and electronic systems to keep up with industry best practices. Chip and Pat Kent both take phone calls from their customers and enjoy troubleshooting problems with them or walking them through maintenance and upgrades. Astonishing customer service develops a loyal customer base for Laurel, driving their success in our industry.
Troubleshooting, Maintenance, and Upgrades
Kent covered troubleshooting, maintenance, and upgrades during his informative demonstrations. Some of the topics ranged from troubleshooting error messages, upgrading outdated or malfunctioning parts, and vending machine maintenance.
Upgrading DigiMax Circuit Boards
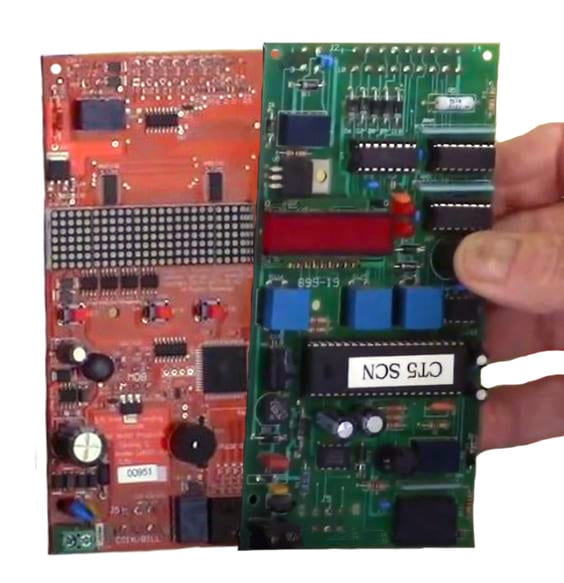
Kent explains that many components found in the original green switchboard from 20 years ago are no longer made. Causing maintenance and upgrades to be difficult. The discontinued components range from the display screen to the microprocessor and can no longer be replaced. Kent tells us “The first component that typically malfunctions is the display.” Segments will light up when they are not supposed to causing weird messages to appear. According to Kent, “A common message that displays is RAY instead of PAY.”
DigiMax systems are created with a larger dot matrix display that accepts credit card payments and fits where the old circuit board was located. A new door is included with the retrofit kit which enables a full view of the display. The new circuits are color-coded by column number. The old boards are green in both machines. In the 3 and 5 column machines, the circuit board is red. In the single-column machine, the circuit board is blue. Laurel color-coded the circuit boards to streamline the customer service process. If someone calling into customer service gives them the board color customer service can figure out which machine the person is troubleshooting.
Digimax Installation Walk Through
Instructions for Three and Five Column Vending Machines
Begin by removing the cover, unplugging the ribbon cable, and loosening the mounting screws. Then lift the coin mechanism frame to unplug the wire harnesses. There are three wire harnesses that need to be unplugged. The first is the coin acceptor, the second one is for the coin cup motor and the last belongs to the main wire harness.
Once the harnesses have been unplugged, place the coin mechanism frame back in the machine to make removing the old circuit board easier. Pull off the old board. The Digi Max Board will fit the space that housed the old board. Press the new board onto the plastic posts in each corner and you should hear it lock.
Finally, put everything back. Remove coin mechanism frame to plug the harnesses back in. Plug in CryptoPay if you have that option. Place the mechanism back, then place the new cover sheet by lining up the top of the sheet with the top of the DigiMax board. You now have a fully functioning DigiMax Display.
Instructions for Single Column Vending Machines
Start by removing the circuit board cover. Unplug the main harness. Press and pull the circuit board from the bottom and push from the back at the same time; the board should come out. Place the new circuit board onto the plastic posts in each corner and snap into place. There is a new plug next to the main harness for CryptoPay. Plug in CryptoPay and wait while the devices communicate. When the devices have connected, you will see both payment options scroll across the display, letting you know you have successfully installed a new circuit board and CryptoPay.
New DigiMax Functions
The new DigiMax board includes a decal listing new functions. There are multiple language and currency options. Set product price for each shelf column. Display brightness can be changed depending if the machine is located indoors or outdoors. Vend counter is unable to be reset by attendants, allowing you to see an accurate count of vends.
Shelf Drop Action Troubleshooting
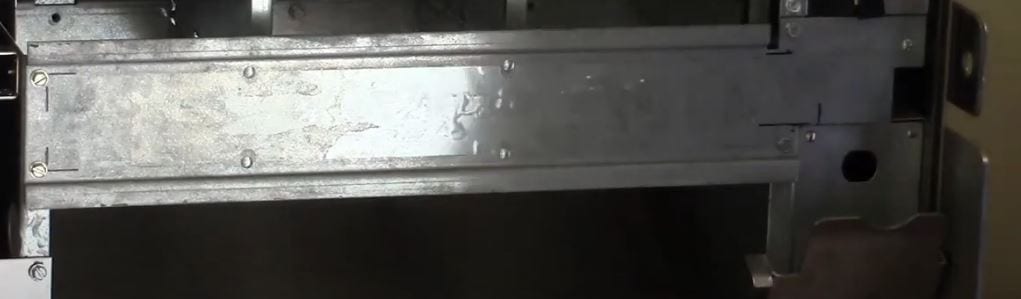
Kent covered a problem where the shelf drop action would not trigger correctly. “The older machines will occasionally see a shelf hanging up and not dropping cleanly,” says Kent. The problem is caused by wear and tear on the notch. The metal wears in areas that are used repeatedly. Most users only fill the machines to a certain point, causing specific areas to wear.

The solution is to lubricate the area just below the notch where the edge is rough. When placing lube, be sure not to get any on the trigger mechanism. The trigger mechanism operates via gravity and lube would cause it to malfunction. Kent recommends using Super Lube Grease, available from Kleen-Rite. Another solution Kent suggested is to buy another shelf assembly and get up to 15 more years of life out of your drop-shelf vendor. Lastly, Kent advised against sending shelf assemblies in for repair because it doesn’t make sense with the shipping costs.
Switch Pad Troubleshooting and Replacement
Switch Pad Troubleshooting
Sometimes a switch pad will malfunction. To check for issues, simply push any of the buttons under the respective column and it should beep. If one of the columns does not beep the switch pad needs to be replaced.
Switch Pad Replacement
To replace a switch pad, mark the machine with the original pad’s location before removal. The best way to ensure alignment is to mark each of the corners. Remove the old pad. Line up the new pad with your alignment marks, but do not press the pad on yet. Close the door and check for alignment with the buttonholes in the door. When aligned, open the door and press on the pad. Close the door and test each button for a beep. If they all beep you have successfully installed a new switch pad.
Shelf Drop and Coin Drop Motors Maintenance
Shelf Drop Motor
The motor is on the back of the shelf unit. Remove the shelf unit by loosening both nuts located at the top of the column you are working on. At the bottom, another screw must be removed. Then you want to unplug the wire harness. Once those steps are completed the shelf can be removed. Tip the shelf column off the thread studs and lift straight up to remove the shelf unit. The vend motor is held on by two screws, remove them and it should come off.
Once removed, look for the metal stud on the motor that spins. You will want to put lube on the stud. Place the motor back on the shelf and reattach it. To reinstall the shelf unit, look for the slit in the bottom of the machine towards the back. Place the tab at the bottom of the shelf unit into that slit and it should click into place. Plug in the wire harness, place the fastener back on the top, and screw in the bottom. That’s all there is to it!
Coin Drop Motor
The coin drop motor is easy to access. Locate the coin mechanism, unplug the ribbon cable, and loosen the fastening screws. You can now remove the coin mechanism by pressing forward on the rear yellow tab on the right side of the coin cup assembly. Check the motor and if needed, place some lube on it. To reinstall, place the front tab in position and push on the back tab. Replace the mechanism, tighten the screws, plug the ribbon cable back in, and you are done.
We would like to thank Chip and all of our Master Class Instructors for the time they took to teach people in our industry about car wash industry topics. We hope everyone that viewed the live stream gained valuable information that will help them run their operations more efficiently. If you missed the Master Class about drop-shelf vending machine maintenance and upgrades, we posted this session and all of the other sessions on our YouTube channel. Head over and take a look at our other videos too!